How can advanced 5-axis measurement redefine industrial inspection?

  • Articles
  • Nov 09,23
Manufacturers have compelling reasons to use 5-axis measurement equipment in their industrial inspection strategies. However, before making any serious decisions, people should evaluate several aspects, says Emily Newton.
How can advanced 5-axis measurement redefine industrial inspection?

Quality control is essential for helping industrial companies maintain competitiveness and avoid costly or dangerous issues. That’s why many businesses utilise 5-axis measurement technologies to optimise their workflows and increase consumer confidence. Here are some outcomes that can occur when people follow best practices and pursue continuous improvement. 

Obtain more manufacturing data
Some producers have a relatively limited approach to quality control, so their inspections only determine if a part passes or fails. However, that information can’t tell manufacturers what’s going wrong in their processes to make a part not pass inspection. An industrial producer may end up with too much waste as a result. 

Such was the case at a company that makes car transmissions. Its previous approach to industrial inspection involved using a hard fixture with bar gages. However, that was a costly and time-consuming process that did not provide the desired granularity with manufacturing statistics. 

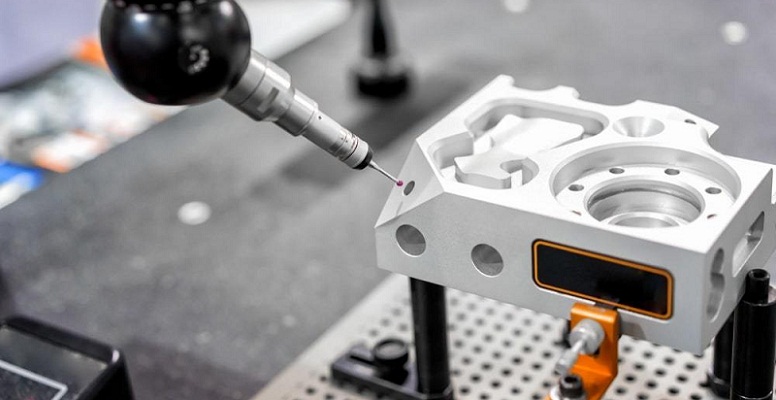
Decision-makers researched their options and eventually settled on a coordinate measuring machine (CMM) with a 5-axis probe head. The company initially began using that equipment to check the position of holes reamed and drilled into transmission cases. The change gave them reliable data that enabled making adjustments to prevent scrapped parts. Manufacturing leaders used that information to improve their best practices for producing high-quality components. 

They also viewed this equipment upgrade as an early step in using the Industrial Internet of Things (IIoT) and connected hardware to enhance production. One common way to do that is to apply sensors to predict machine breakdowns. Then, manufacturers can become aware of problems sooner, eliminating or shortening downtime. The company’s measurement probe gathers high-density measurements of feature size, form and location with excellent accuracy. 

Further upgrades to five-axis measurement equipment
Leaders were so happy with how the 5-axis measurement system worked that they began discussing options for a second setup with the service provider. 

Those conversations centered on the production of larger parts and the addition of a robotic head and gripper. The company intended to measure two knock holes before adding the rest of the openings. However, the measuring equipment would need to check every hole on every part — handling a more stringent process than the previous effort.

The 5-axis probe on the new system gathers up to 4,000 measurement points per second, significantly increasing output. In addition to facilitating process improvement, the improved data collection enhances part traceability. Knowing what happens to a component within and outside the factory allows company leaders to identify additional ways to improve. 

Save significant time 
One of the reasons that machine shops invest in multi axis equipment is that it can work at numerous angles and access several sides of the workpiece without requiring repositioning. That advantage helps operators increase equipment utilisation by reducing interruptions. Keeping the workpiece minimises errors and boosts productivity.

Similarly, fixture plates support metrology by securing the measuring equipment and the inspected parts. Manufacturers increasingly cater to customers using 5-axis measurement equipment by offering compatible modular fixture plates. Then, users can check different components more quickly or change the orientation of a single part to verify that various dimensions are within specifications. 

In one inspection lab, a particular component took 11 minutes to inspect and three minutes to unload and reload from the production line. Using a modular system improved the swap time by two-and-a-half minutes. A look at the data across a longer span was even more impressive. When inspectors used this arrangement to check 150 parts, they saved 300 minutes.

Many modular fixture plates feature designs that work with any CMM equipment. That’s beneficial if a company does not currently use 5-axis measurement equipment but plans to invest in it soon. 

Achieve greater accuracy
Many customers — such as those in the aerospace and medical device industries — rightfully demand extraordinarily high accuracy. The same is true for those in the market for high-dollar products, such as sports cars. When manufacturing leaders sought to improve the production of the Lotus Emira automobile, they began with a quality control upgrade of 5-axis measurement equipment. The decision-makers chose a twin-arm CMM that could measure the whole car body through a non-contact method. 

Each arm has advanced, triple-cross lasers that automatically and simultaneously measure aspects on each side of the automobile. The manufacturer uses the CMM at two stages within the car’s assembly process. That approach results in 130 measurements taken during two scans. The first happens in 12 minutes and the second is an eight-minute scan. 

All measurements get fed to production line staff, allowing them to efficiently identify and mitigate problems. Additionally, the three laser lines on each scanner capture data quickly, matching the production line’s pace. The company has an overarching goal of zero-defect manufacturing, and this high-tech system goes a long way toward helping it reach that milestone.

The company’s former process took up to five hours and involved examining one chassis out of every batch of approximately 24. However, leaders realized this method was no longer sufficiently precise, particularly due to the high-end customers they wanted to target within the global market. 

They explored other options, including robot-mounted measuring heads. However, the executives ultimately concluded that the twin-arm CMM was the most appropriate solution for their current and future needs. 

Essential considerations before purchasing 5-axis measurement equipment 
This overview shows that manufacturers have compelling reasons to use 5-axis measurement equipment in their industrial inspection strategies. However, before making any serious decisions, people should evaluate several aspects. 

A good starting point is to consider how much they want to spend. They should also keep in mind that allowing for higher-than-anticipated upfront costs could enable purchasing equipment that will suffice for longer. 

Potential buyers should also think about what they want to measure and how many data points they hope to collect. Doing so will help them narrow down commercial options or decide if they should engage with service providers about custom solutions. 

Finally, decision-makers should think about how they’ll track and define progress. Choosing key metrics — such as inspection cycle time or data points captured during a single inspection — can help them quantify how much their equipment upgrades have changed their processes and will support the bottom line.

If some executives feel hesitant about equipment investments, they should learn about how similar companies have benefited from more advanced measuring equipment. Getting statistics about process improvements can help them think positively about the future and what’s possible. 

About the author:
Emily Newton is a tech and industrial journalist and the Editor-in-Chief of Revolutionized Magazine. Subscribe to the Revolutionized newsletter for more content from Emily. 

Related Stories

Machine Tools & Accessories
Surface Modification Technologies aims for global expansion: Dr Umesh Mhatre

Surface Modification Technologies aims for global expansion: Dr Umesh Mhatre

In this interview, Dr Umesh Mhatre, MD, Surface Modification Technologies Pvt Ltd, highlights his company’s contribution to the growth of manufacturing sector and plans for IMTEX 2025 exhibition.

Read more
Machine Tools & Accessories
India needs strong machine tools industry to become a global manufacturing hub

India needs strong machine tools industry to become a global manufacturing hub

For the Indian manufacturing sector to reach $ 1 trillion, the machine tools industry needs to fire on all cylinders as it enables the production of other machines, parts and equipment for a wide ra..

Read more

Related Products

Turning Tools

MACHINE TOOLS, POWER & HAND TOOLS

Duracarb Cutting Tools offers a wide range of Turning Tools. 

Read more

Request a Quote

Carbide Burrs

MACHINE TOOLS, POWER & HAND TOOLS

SRT Industrial Tools & Equipments offers a wide range of carbide burrs.

Read more

Request a Quote

Mill Saw Files Hand

MACHINE TOOLS, POWER & HAND TOOLS

PFERD offers a wide range of mill saw files hand.

Read more

Request a Quote

Hi There!

Now get regular updates from IPF Magazine on WhatsApp!

Click on link below, message us with a simple hi, and SAVE our number

You will have subscribed to our Industrial News on Whatsapp! Enjoy

+91 84228 74016